


Shoulder Pulley Exercises: A Complete Guide for Rehabilitation
Shoulder pulleys are a rehabilitation staple for good reason. They offer a controlled, low-cost way to work through the overhead range of motion (ROM), and patients can do them at home without supervision. For physiotherapists managing post-surgical shoulder cases, that independence is valuable.
This guide covers the main shoulder pulley exercises, how to sequence them through a rehabilitation programme, and what to watch for when prescribing home use.
Why shoulder pulleys work
The pulley mechanism allows the stronger or unaffected arm to assist the injured side through its range of motion. This passive-assisted movement is particularly important in the early post-operative period, when active use of the shoulder is restricted, and the goal is tissue mobility rather than strength.
Because the patient controls the movement, the exercise is low-risk. There's no external load beyond gravity, and the range can be self-limited at the point of discomfort. That makes pulleys appropriate from the early stages of rehabilitation, well before active exercises are introduced.
They're commonly used following:
- Rotator cuff repair
- Total or reverse shoulder replacement
- Shoulder capsular release
- Bankart repair and other stabilisation procedures
- Adhesive capsulitis (frozen shoulder) management
Core shoulder pulley exercises
The following exercises form the foundation of most pulley-based protocols. They're presented in order of typical introduction through a rehab programme.
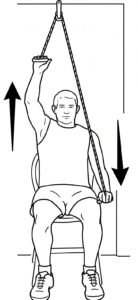
Forward flexionThe most commonly prescribed starting point. The patient stands or sits facing the door, holds both handles, and uses the unaffected arm to draw the injured arm upward into flexion. The goal is gradual, pain-free elevation rather than forcing range. Starting target: 90° flexion in the first two weeks post-op, progressing toward full elevation as healing allows. |
 |
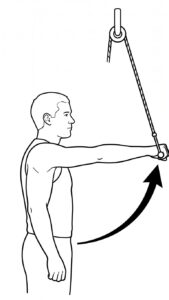
AbductionThe patient stands side-on to the door and works the injured arm out to the side. This is typically introduced slightly later than flexion, as abduction places more demand on the rotator cuff. Ensure the patient understands that the movement should feel like a stretch, not a sharp pull. |
 |
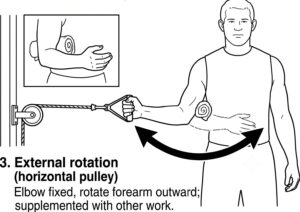
External rotation (pulley assist)Less commonly performed with a standard overhead pulley, but a pulley with a horizontal configuration can assist external rotation work. For most post-surgical cases, this is supplemented with other exercises rather than the pulley alone. |
 |
Sequencing through rehabilitation
Weeks 1–4 (early phase): Passive-assisted flexion and abduction only. Focus on achieving pain-free motion within the prescribed range. Patients typically perform 2–3 sets of 10 repetitions, two to three times daily.
Weeks 4–8 (mid phase): Increase target range incrementally. Begin working toward the range limits set by the surgeon or protocol. Some patients can introduce light active-assisted work alongside pulley sessions.
Weeks 8+ (later phase): Pulley work continues as a warm-up and mobility tool while active strengthening takes over as the primary focus. Frequency reduces as the range is consolidated.
Prescribing for home use
Most patients can set up a door pulley independently following a brief demonstration. A few practical points worth covering:
Door anchor positioning: The anchor should sit at the top of the door frame, with the door closed toward the patient. A door that opens away from the patient creates a safer setup.
Seated vs standing: Seated use is preferable early on, particularly for older patients or those with balance concerns. It also makes it easier to control the range at the end of the movement.
Repetitions and frequency: More frequent, shorter sessions tend to work better than longer sessions twice a day. Three sets of 10, three times daily, is a typical starting prescription.
When to stop: Patients should understand that discomfort and a stretch sensation are expected; sharp, catching, or worsening pain is not. Clear guidance here reduces unnecessary A&E presentations and anxious phone calls.
Choosing the right shoulder pulley
Not all pulleys are the same. For clinical prescription, a few features matter:
- Secure door anchor that doesn't require drilling or permanent fixation
- Smooth-running cord that won't snag mid-movement
- Comfortable foam or padded handles particularly important for elderly patients
- Cord length suited to the patient's height
trimbio stocks shoulder pulleys designed for clinical and home rehabilitation use. Shop here.
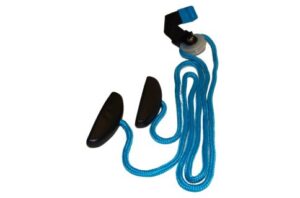 |
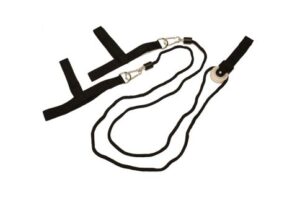 |
| trimbio Shoulder Pulley | Shoulder Pulley with Hand Support |
Related guides
- How to use a shoulder pulley after rotator cuff surgery — step-by-step setup and exercise instructions
- Shoulder ROM exercises: getting the most from your pulley — progression tips and common mistakes
Sources:
Oxford University Hospitals NHS Foundation Trust — Rotator cuff repair rehabilitation patient information
University Hospital Southampton NHS Foundation Trust — Rotator cuff repair exercises
North Tees and Hartlepool NHS Foundation Trust — Small or medium rotator cuff repair: physiotherapy exercise and advice
Shoulderdoc.co.uk (Mr Ali Narvani, Consultant Shoulder Surgeon) — Rotator cuff repair rehabilitation protocol
Physiopedia — Shoulder anatomy and rotator cuff rehabilitation